Lab 2 - Hex Editor
Introduction
Whether punch cards, paper tape, magnetic tape, magnetic disk, optical disc, NAND-flash, or technologies yet unknown, large quantities of digital information have always been, and likely will always remain, giant streams of sequential bits. These are stored physically in something, so they have limited flexibility: you can change a bit to 0 or 1, but you can’t remove a bit entirely without moving every other bit over to fill in the gap.
When interacting with such “binary files,” it is typical to use a tool known as a “hex editor.” This shows each byte (set of eight bits) as a two-digit hexadecimal value and allows users to edit that information in place.
In this lab, you’ll explore some of what hex editors can do.
Getting a hex editor
We’ll use an online hex editor:
Although it is an online tool, you need to open files from your local drive; your basic process is
- Download a file to edit
- Go to hexed.it
- Use the “Open file” option on the top to load the file
- Edit the file as desired
- Use “Export” to save the file
ASCII
Many files contain textual information, generally encoded using ASCII or a compatible superset of that such as UTF-8, ISO-8859-1, Windows-1252, Mac-Roman, etc. In these, each character is mapped to a single byte between 0 and 127; bytes larger than 127 are often parts of multi-byte character encodings and vary by encoding variant.
| Hex | Char |
|---|---|
| 09 | TAB (\t) |
| 0A | LF (\n) |
| 0D | CR (\r) |
| 20 | Space |
| 21 | ! |
| 22 | " |
| 23 | # |
| 24 | $ |
| 25 | % |
| 26 | & |
| 27 | ' |
| 28 | ( |
| 29 | ) |
| 2A | * |
| 2B | + |
| 2C | , |
| 2D | - |
| 2E | . |
| 2F | / |
| 30 | 0 |
| 31 | 1 |
| 32 | 2 |
| 33 | 3 |
| 34 | 4 |
| 35 | 5 |
| 36 | 6 |
| 37 | 7 |
| 38 | 8 |
| 39 | 9 |
| 3A | : |
| 3B | ; |
| 3C | < |
| 3D | = |
| 3E | > |
| 3F | ? |
| Hex | Char |
|---|---|
| 40 | @ |
| 41 | A |
| 42 | B |
| 43 | C |
| 44 | D |
| 45 | E |
| 46 | F |
| 47 | G |
| 48 | H |
| 49 | I |
| 4A | J |
| 4B | K |
| 4C | L |
| 4D | M |
| 4E | N |
| 4F | O |
| 50 | P |
| 51 | Q |
| 52 | R |
| 53 | S |
| 54 | T |
| 55 | U |
| 56 | V |
| 57 | W |
| 58 | X |
| 59 | Y |
| 5A | Z |
| 5B | [ |
| 5C | \ |
| 5D | ] |
| 5E | ^ |
| 5F | _ |
| Hex | Char |
|---|---|
| 60 | \` |
| 61 | a |
| 62 | b |
| 63 | c |
| 64 | d |
| 65 | e |
| 66 | f |
| 67 | g |
| 68 | h |
| 69 | i |
| 6A | j |
| 6B | k |
| 6C | l |
| 6D | m |
| 6E | n |
| 6F | o |
| 70 | p |
| 71 | q |
| 72 | r |
| 73 | s |
| 74 | t |
| 75 | u |
| 76 | v |
| 77 | w |
| 78 | x |
| 79 | y |
| 7A | z |
| 7B | { |
| 7C | | |
| 7D | } |
| 7E | ~ |
Download ritchie.txt and open it in your hex editor. You should see both a hex edit space and a character edit space, along with some numerical interpretations.
To check off this lab, you’ll need to demonstrate to your TA that you can do the following in the hex editing space:
- Put the first line into all upper-case.
- Replace all line breaks with spaces.
Images
There are many image formats, and many of them use esoteric math to encode large regions of color succinctly. However, some are uncompressed and represent colors directly; these generally include a header of some kind, followed by three bytes per pixel: a red byte (0 for no red light, 255 for right red light), a green byte (also 0–255), and a blue byte (ditto).
One such uncompressed format is the BMP file format. The BMP file format hgas several variants, but the most common has
- Width of image as a little-endian 32-bit number in bytes 18–21
- Height of image as a little-endian 32-bit number in bytes 22–25
- Image data starting at a byte whose index is given in a 4-byte little-endian number in bytes 10–13
Here is a example of from Prof. Yung-Hsiang Lu and Prof. Alexander J. Quinn. Here are some example hex values from bitmap image 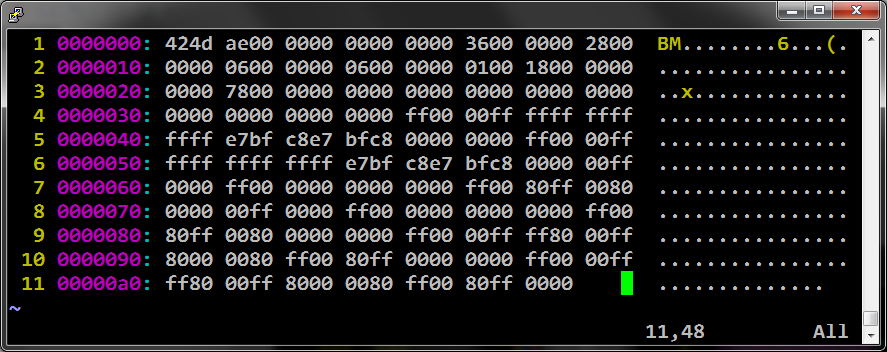
Now here are the same hex values. Just labeled with fields that they represent. Can you find the hex values with the height and width label? 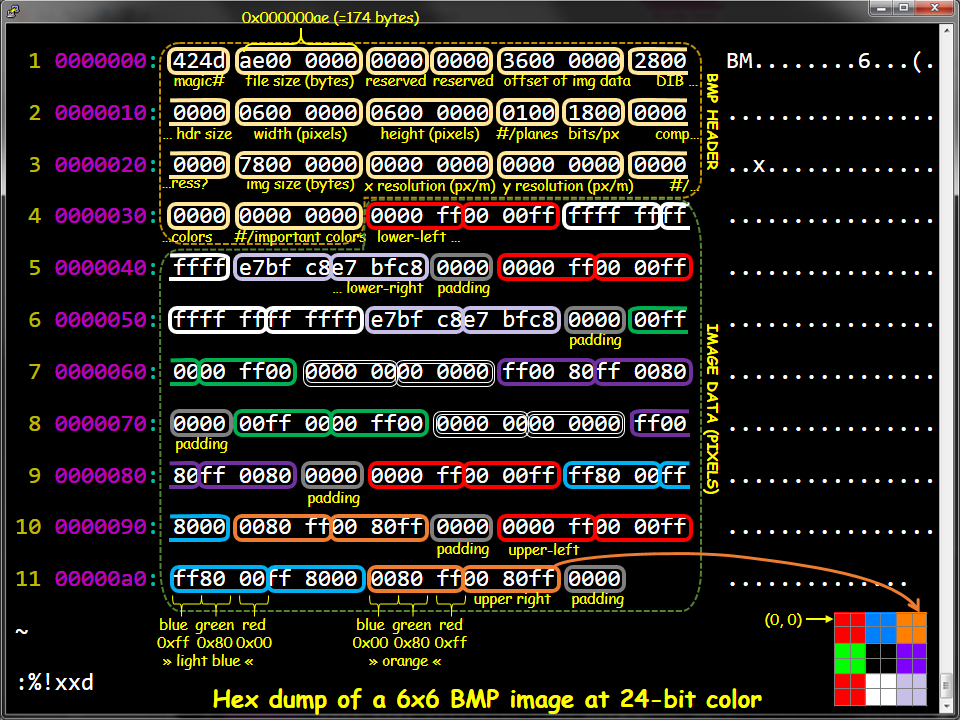
Lab Exercise

Low-res Dennis Ritchie headshot
Download Dennis-Ritchie.bmp and do the following:
-
Swap the width and height values and save the result as
swap.bmp. This should look odd and horizontally streaky. If you can’t see Dennis Ritchie you did it correctly. -
Steganography is the art of hiding information such that people seeing it don’t know it is even there. One simple form of steganography hides information in the low-order bits of each pixel in an image.
Starting from the original Dennis-Ritchie.bmp, encode “win” in the low-order bit of the last 24 bytes of image data. In particular,
- convert “win” to 3 bytes using ASCII
- Encode those 3 bytes as 24 big-endian bits
- For each of the last 24 image data bytes (Address 0x09BA2 -> 0x09BB9 inclusive)
- set the low-order bit of the byte to 0 if the corresponding bit of “win” is 0
- set the low-order bit of the byte to 1 if the corresponding bit of “win” is 1
Suppose we want to encode “x” in the low-order bits of data consisting of bytes
01 23 54 76 89 a4 cd 5f. Since “x” is ASCII \(78_{16}\), or \(01111000_2\), we encode this by setting the lower-order bits as follows:01set bit to 0 00(changed bit)23set bit to 1 23(unchanged, as it was already 1)54set bit to 1 55(changed bit)76set bit to 1 77(changed bit)89set bit to 1 89(unchanged, as it was already 1)a4set bit to 0 a4(unchanged, as it was already 0)cdset bit to 0 cc(changed bit)5fset bit to 0 5e(changed bit) - Save the resulting image as
hide.bmpand verify that it does not look odd when viewed as an image
Check-off (What to submit)
To GradeScope:
- Once you’ve added your hidden word save the file as
hide.bmpand upload it to GradeScope. The autograder will read the file and print out the last 24 bytes and the hidded word the bytes contain.
To check-off this lab, show a TA
- Remember that showing up and working with/helping other people 70% of your grade. Check in with TA so that they can give you credit.
For most students, this should happen in lab; if you have completed the lab exercise before lab occurs, you are welcome to do it in their office hours.